

Genel Bakış
Ana ekranda büyük bir saat, tarih ve sıcaklık bilgilerinin yanı sıra Müzik Çalar ve Çalar Saat için iki düğme bulunur.
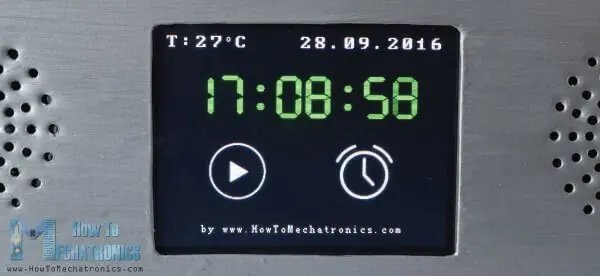
Müzik Çalar'a girersek, ekranın ortasındaki büyük “Oynat” düğmesine basarak müzik çalmaya başlayabiliriz. Hemen yanında, önceki veya sonraki şarkıyı çalmak için iki düğme daha var.
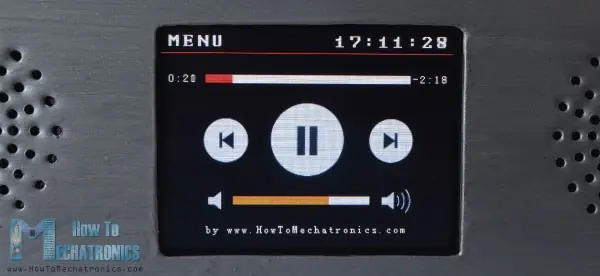
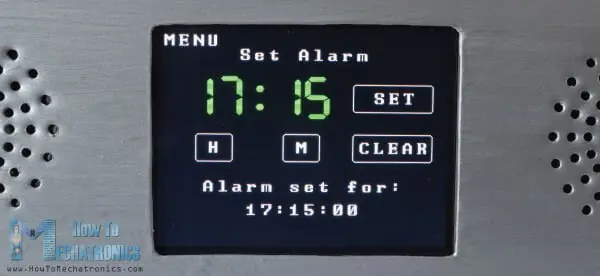
Ekranın alt kısmında bir ses düzeyi çubuğu ve ses seviyesini azaltmak ve artırmak için iki düğme bulunur. Sağ üst köşede bir saat var ve sol tarafta bizi ana ekrana geri getiren “Menü” düğmesi var.Diğer yandan, Çalar Saat'e girersek, saatleri ve dakikaları ayarlamak için iki düğmeyi kullanarak bir alarm ayarlayabiliriz.
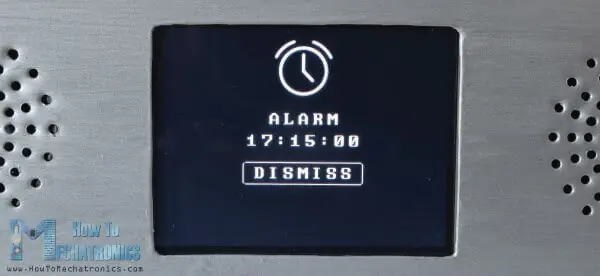
Alarm etkinleştirildiğinde, yüksek bir ses seviyesinde çalmaya başlar ve “Kapat” düğmesine basana kadar çalmaya devam eder.
Nasıl Çalışır
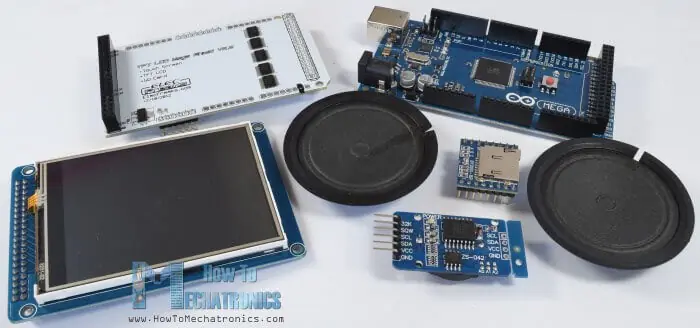
Şimdi bu cihazın nasıl çalıştığına bakalım. Arduino Mega 2560 ve ekranı bağlamak için uygun bir shield ile birlikte 3.2 inç TFT dokunmatik ekran kullanır. Müzik çalmak için BY8001 MP3 Çalar modülünü ve çalar saat için DS3231 Gerçek Zamanlı Saat modülünü kullanacağız.
Bu Arduino Projesi için gerekli bileşenleri aşağıdaki bağlantılardan alabilirsiniz:
- Arduino MP3 Modülü
- 3.2 ″ TFT Dokunmatik Ekran
- TFT Ekran Mega Shield
- 0.5W Hoparlör
- DS1302 Gerçek Zamanlı Saat - RTC Modül
- Arduino Mega 2560
Devre Şemaları
İşte bu projenin devre şemaları:
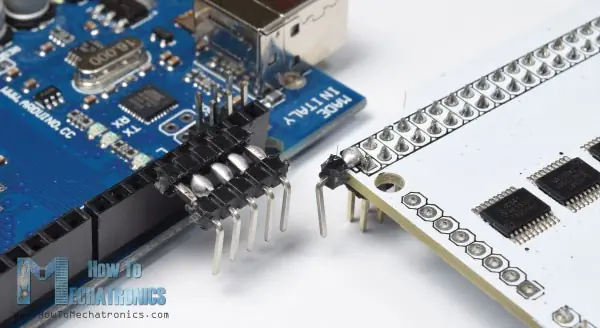
TFT shield, arduino mega'nın pinlerini engellemektedir. Bu yüzden shield ve Arduino arasına yerleştirebileceğimiz özel yapım bir pin başlığı yapmamız gerekiyor.
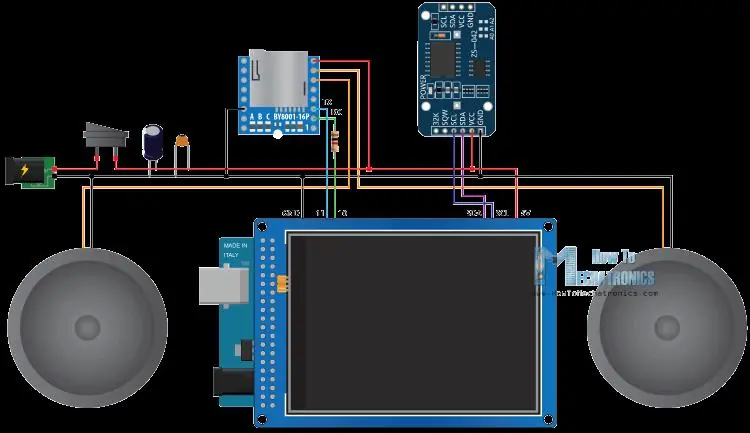
Ayrıca, Arduino'ya güç vermek için, shield zaten tüm Arduino VCC pimlerini kullandığı için, shield üzerindeki 5V pime ek pin başlığı lehimlememiz gerektiğini unutmayın. Her şeyi birbirine bağladıktan sonra Arduino'yu programlamaya devam edebiliriz.
MP3 Çalar Modülü
MicroSD kartlarla çalışan ve MP3 ve WAV ses formatı dosyalarını destekleyen bir MP3 modülüdür. Modül yerleşik 3W güç amplifikatörüne sahiptir ve doğrudan tek bir 3W hoparlörü kullanabilir.
MP3 Çalar modülü, 5 giriş pini kullanılarak veya seri iletişim yoluyla bir mikro denetleyici kullanılarak düğme kontrollü hale getirilebilir.
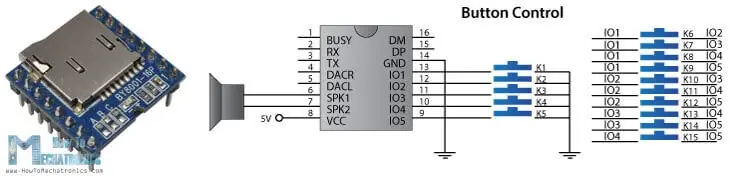
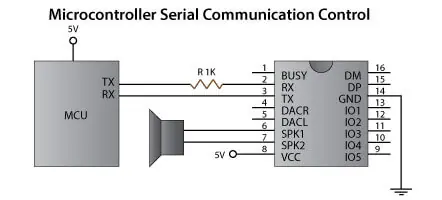
Burada, modülün seri port pinlerinin 3.3V'de çalıştığını, böylece modülün RX pininin 1K direnç yoluyla Arduino TX pinine bağlanması gerektiğini unutmayın. Ayrıca kontrol modlarını seçmek için kullanılan 3 A, B ve C bağlantı noktalarına da dikkat edin. Bir mikrodenetleyici kullanarak modülü kontrol etmek için bu pedlerdeki 3 rezistörün çıkarılması gerekir. 6 ve 7 numaralı pimler, düşük güçlü hoparlörleri veya harici amplifikatör kullanılıyorsa 4 ve 5 numaralı pimleri doğrudan bağlamak için kullanılabilir. Arduino bölümüne gelince, en kolay yol GitHub'dan indirilebilecek BY8001 kütüphanesini kullanmaktır. Demo örneklerinden bazılarını açarsak nasıl çalıştığını görebiliriz. Bu nedenle, kurulum bölümünde modülü başlattıktan sonra, modülü kontrol etmek için ısmarlama işlevlerden herhangi birini kullanabiliriz.
Arduino Kaynak Kodu
Şimdi Arduino Dokunmatik Ekran MP3 Müzik Çalar ve Alarmlı Çalar Saat koduna bir göz atmaya hazırız. Kod biraz daha uzun olduğundan, daha iyi anlaşılması için, programın kaynak kodunu her bölüm için açıklama içeren bölümlere ekledim. Ve bu makalenin sonunda kaynak kodun tamamını paylaştım. İlk önce TFT dokunmatik ekran kütüphanelerini , BY8001-16P MP3 Çalar ve DS3231 Gerçek Zamanlı Saat modülünü ve seri iletişim kütüphanesini eklememiz gerekiyor. Sonra uygun nesneleri oluşturmalı ve program için gerekli bazı değişkenleri tanımlamalıyız.
#include <UTFT.h>
#include <URTouch.h>
#include <SoftwareSerial.h>
#include <BY8001.h>
#include <DS3231.h>
//==== Creating Objects
UTFT myGLCD(SSD1289, 38, 39, 40, 41); //Parameters should be adjusted to your Display/Schield model
URTouch myTouch( 6, 5, 4, 3, 2);
SoftwareSerial mp3Serial(11, 10); // RX, TX
BY8001 mp3; // creating an instance of class BY8001 and call it 'mp3'
DS3231 rtc(SDA, SCL);
//==== Defining Fonts
extern uint8_t SmallFont[];
extern uint8_t BigFont[];
extern uint8_t SevenSegNumFont[];
extern unsigned int MusicPlayerButton[0x1040];
extern unsigned int AlarmButton[0x1040];
extern unsigned int ButtonPlay[0x1AE9];
extern unsigned int ButtonPause[0x1AE9];
extern unsigned int PreviousButton[0x9C4];
extern unsigned int NextButton[0x9C4];
extern unsigned int VolumeDown[0x170];
extern unsigned int VolumeUp[0x3B8];
int x, y; // Variables for the coordinates where the display has been pressed
char currentPage, playStatus;
int iV = 15;
int trackNum = 1;
int b = 16;
int aHours = 0;
int aMinutes = 0;
boolean alarmNotSet = true;
String alarmString = "";
float currentTemperature, temperature;
static word totalTime, elapsedTime, playback, minutes, seconds, lastSeconds, minutesR, secondsR;
String currentClock, currentHours, currentMinutes, currentSeconds, currentDate;
String timeString, hoursString, minutesString, secondsString, hoursS, minutesS, secondsS, dateS;
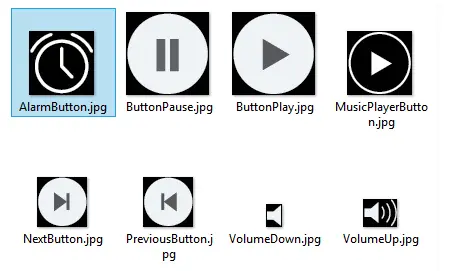
Burada bitmaplerin tanımlanmasını not edebiliriz. Programın bazı düğmeleri aslında TFT kütüphanesi ile birlikte gelen ImageConverter565 aracı kullanılarak bitmap'lere dönüştürülen görüntülerdir. [gallery link="none" columns="1" size="full" ids="8836"] Bu nedenle, “ .c ” dosyalarının çizimi başlatırken yüklenebilmeleri için kod dosyasının dizinine eklenmesi gerekir. Buradan bu görüntüleri ve “ .c ” dosyalarını indirebilirsiniz. Kurulum bölümünde nesneleri başlattıktan sonra, ana ekranın tüm grafiklerini çizen drawHomeScreen () özel işlevini çağırıyoruz. Ayrıca burada playStatus, currentTemp ve Date, birimin başlangıç değeri vb. Gibi bazı değişkenlerin başlangıç değerlerini ayarlıyoruz.
void setup() {
 // Initiate display
 myGLCD.InitLCD();
 myGLCD.clrScr();
 myTouch.InitTouch();
 myTouch.setPrecision(PREC_MEDIUM);
 // Initialize the rtc object
 rtc.begin();
 // Music
 Serial.begin(9600); // set serial monitor baud rate to Arduino IDE
 mp3Serial.begin(9600); // BY8001 set to 9600 baud (required)
 mp3.setup(mp3Serial); // tell BY8001 library which serial port to use.
 delay(800); // allow time for BY8001 cold boot; may adjust depending on flash storage size

 drawHomeScreen(); // Draws the Home Screen
 currentPage = '0'; // Indicates that we are at Home Screen
 playStatus = '0';
 mp3.setVolume(15);
 delay(100);
 currentTemperature = rtc.getTemp();
 currentDate = rtc.getDateStr();
 currentClock = rtc.getTimeStr();
 timeString = rtc.getTimeStr();
 currentHours = timeString.substring(0, 2);
 currentMinutes = timeString.substring(3, 5);
 currentSeconds = timeString.substring(6, 8);
}
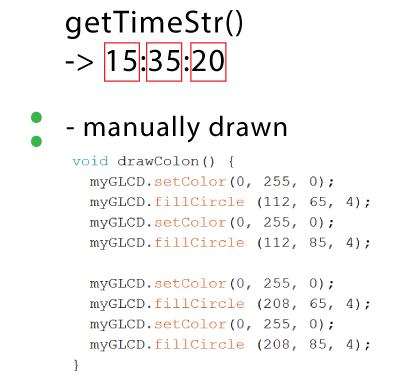
Sıradaki döngü bölümü; CurrentPage değişkenini 0 olarak ayarladığımız için ilk if ifadesi true'dur, bu da ana ekranda olduğumuzu gösteriyor. Burada bir sonraki if ifadesiyle saatte bir değişiklik olup olmadığını kontrol ediyoruz ve bu her saniye gerçekleşiyor. Şimdi, TFT kitaplıklarının sayılar dışında herhangi bir karakteri desteklemeyen yedi segment yazı tipini kullandığımız ve saati okumak için yalnızca getTimeStr () işleviyle gelen dizeden sayıları çıkarmamız gerekiyor.
Dolayısıyla substring () işlevini kullanarak saatleri, dakikaları ve saniyeleri ayrı değişkenlere alırız ve saniyede, dakikalarda veya saatlerde her değişiklik gerçekleştiğinde bunları yazdırırız. Benzer şekilde, önceki duruma göre bir değişiklik olup olmadığını kontrol ediyoruz.
void loop() {
 // Homes Screen
 if (currentPage == '0') {
 // Checks for change of the clock
 if ( currentClock != rtc.getTimeStr()) {
 timeString = rtc.getTimeStr();
 hoursS = timeString.substring(0, 2);
 minutesS = timeString.substring(3, 5);
 secondsS = timeString.substring(6, 8);
 myGLCD.setFont(SevenSegNumFont);
 myGLCD.setColor(0, 255, 0);
 myGLCD.print(secondsS, 224, 50);

 if ( currentMinutes != minutesS ) {
 myGLCD.print(minutesS, 128, 50);
 currentMinutes = minutesS;
 }
 if ( currentHours != hoursS ) {
 myGLCD.print(hoursS, 32, 50);
 currentHours = hoursS;
 }
 // Checks for change of the date
 dateS = rtc.getDateStr();
 delay(10);
 if ( currentDate != dateS){
 myGLCD.setColor(255, 255, 255); // Sets color to white
 myGLCD.setFont(BigFont); // Sets font to big
 myGLCD.print(rtc.getDateStr(), 153, 7);
 }
 // Checks for change of the temperature
 temperature = rtc.getTemp();
 delay(10);
 if ( currentTemperature != temperature ){
 myGLCD.setColor(255, 255, 255); // Sets color to white
 myGLCD.setFont(BigFont); // Sets font to big
 myGLCD.printNumI(temperature, 39, 7);
 currentTemperature = temperature;
 }
 delay(10);
 currentClock = rtc.getTimeStr();
 }
Ardından, myTouch.dataAvailable () işlevini kullanarak ekrana dokunup dokunmadığımızı ve bunun Müzik Çalar veya Alarm düğmesi olup olmadığını kontrol ederiz. Müzik Çalar düğmesi ise, önce düğmenin etrafına düğmeye basıldığını gösteren kırmızı bir daire çizen drawFrame () özel işlevini çağırırız. Ayrıca bu özel fonksiyon, düğmeyi bırakana kadar while döngüsüne sahiptir. Bundan hemen sonra currentPage değişkenini 1 olarak ayarlıyoruz, ekranı temizliyoruz ve Müzik Çalar ekranının tüm grafiklerini çizen drawMusicPlayerScreen () özel fonksiyonunu çağırıyoruz. Benzer şekilde, biz Alarm düğmesine basarsak, currentPage değişkenini 2'ye ayarlar ve ekranı temizleriz.
// Checks whether the screen has been touched
 if (myTouch.dataAvailable()) {
 myTouch.read();
 x = myTouch.getX(); // X coordinate where the screen has been pressed
 y = myTouch.getY(); // Y coordinates where the screen has been pressed
 // If we press the Music Player Button
 if ((x >= 55) && (x <= 120) && (y >= 125) && (y <= 190)) {
 drawFrame(87, 157, 33);
 currentPage = '1';
 myGLCD.clrScr();
 delay(100);
 drawMusicPlayerScreen();
 delay(100);
 }
 // If we press the Alarm Button
 if ((x >= 195) && (x <= 260) && (y >= 125) && (y <= 190)) {
 drawFrame(227, 160, 29);
 currentPage = '2';
 myGLCD.clrScr();
 }
 }
Ardından, Müzik Çalar ekranında neler olduğunu görelim. Burada sürekli ekrana dokunup dokunmadığımızı kontrol ediyoruz. Oynat düğmesine dokunursak ve geçerli playStatus değişkeni 0 ise, MicroSD karttaki ilk şarkıyı çalmaya başlayacak olan mp3.playTrackFromFolder () işlevini çağıracağız. Aynı zamanda, Duraklat düğmesini çizen ve playStatus değişkenini 2 olarak ayarlayan drawPauseButton () özel işlevini çağırırız. PlayStatues değişkenine bağlı olarak sonraki iki if ifadesini kullanarak şarkıyı çalma ve duraklatma arasında geçiş yaparız.
// Music Player Screen
 if (currentPage == '1') {
 if (myTouch.dataAvailable()) {
 myTouch.read();
 x = myTouch.getX(); // X coordinate where the screen has been pressed
 y = myTouch.getY(); // Y coordinates where the screen has been pressed
 // If we press the Play Button
 if ((x >= 116) && (x <= 204) && (y >= 77) && (y <= 165)) {
 if (playStatus == '0') {
 drawFrame(159, 121, 42);
 drawPauseButton();
 mp3.playTrackFromFolder(00, 001);
 delay(100);
 playStatus = '2';
 return;
 }
 if (playStatus == '1') {
 drawFrame(159, 121, 42);
 drawPauseButton();
 mp3.play();
 delay(100);
 playStatus = '2';
 return;
 }
 if (playStatus == '2') {
 drawFrame(159, 121, 42);
 drawPlayButton();
 mp3.pause();
 delay(100);
 playStatus = '1';
 return;
 }
 }
Benzer şekilde, basılan her düğme için önceki veya sonraki parçayı çalmak, ses seviyesini azaltmak veya artırmak için uygun işlevleri çağırırız ve bizi ana ekrana geri getiren “Menü” düğmesini kullanırız.
// If we press the Previous Button
 if ((x >= 45) && (x <= 95) && (y >= 97) && (y <= 147)) {
 drawFrame(70, 121, 26);
 mp3.previousTrack();
 delay(100);
 drawTrackBar();
 }
 // If we press the Next Button
 if ((x >= 227) && (x <= 277) && (y >= 97) && (y <= 147)) {
 drawFrame(252, 122, 26);
 mp3.nextTrack();
 delay(100);
 drawTrackBar();
 }
 // If we press the VolumeDown Button
 if ((x >= 35) && (x <= 75) && (y >= 165) && (y <= 209)) {
 drawUnderline(45, 205, 65, 205);
 if (iV >= 0 & iV <= 30) {
 iV--;
 drawVolume(iV);
 }
 mp3.decreaseVolume();
 delay(100);
 }
 // If we press the VolumeUp Button
 if ((x >= 230) && (x <= 280) && (y >= 165) && (y <= 209)) {
 drawUnderline(235, 205, 275, 205);
 if (iV >= 0 & iV <= 30) {
 iV++;
 drawVolume(iV);
 }
 mp3.increaseVolume();
 delay(100);
 }
 // If we press the MENU Button
 if ((x >= 0) && (x <= 75) && (y >= 0) && (y <= 30)) {
 myGLCD.clrScr();
 drawHomeScreen(); // Draws the Home Screen
 currentPage = '0';
 return;
 }
İlerleme çubuğunu güncellemek için sonraki if ifadesi kullanılır.
// Updates the track bar
 if (playStatus == '1' || playStatus == '2') {
 trackPlayTime();
 }
Müzik çalınıyorsa, mp3.getElapsedTrackPlaybackTime () gibi Müzik Çalar kitaplık işlevlerinden bazılarını kullanan trackPlayTime () özel işlevini çağırırız. Bu işlev geçen ve kalan zamanı ve parça ilerleme çubuğu grafiklerini hesaplar ve yazdırır. PrintClock () özel işlevini kullanarak saati sağ üst köşeye yazdırıyoruz.
// Updates the track bar
void trackPlayTime() {
 totalTime = mp3.getTotalTrackPlaybackTime();
 delay(10);
 elapsedTime = mp3.getElapsedTrackPlaybackTime();
 delay(10);
 minutes = (int)elapsedTime / 60;
 seconds = (((float)elapsedTime / 60) - minutes) * 60;
 playback = totalTime - elapsedTime;
 minutesR = (int)playback / 60;
 secondsR = (((float)playback / 60) - minutesR) * 60;
 myGLCD.setFont(SmallFont);
 myGLCD.setColor(255, 255, 255);
 myGLCD.printNumI(minutes, 8, 48);
 myGLCD.print(":", 16, 48);
 myGLCD.printNumI((int)seconds, 24, 48, 2, '0');
 myGLCD.print("-", 276, 48);
 myGLCD.printNumI(minutesR, 284, 48);
 myGLCD.print(":", 292, 48);
 myGLCD.printNumI((int)secondsR, 300, 48, 2, '0');
 int trackBarX = map(elapsedTime, 0, totalTime, 0, 224);
 myGLCD.setColor(255, 0, 0);
 myGLCD.fillRect (48, 50, 48 + trackBarX, 50 + 8);
 if (totalTime == elapsedTime) {
 mp3.nextTrack();
 delay(30);
 myGLCD.setColor(255, 255, 255);
 myGLCD.fillRect (48, 50, 48 + 224, 50 + 8);
 }
}
Sonraki işlem Çalar Saat ekranı. Burada önce tüm grafikleri, saati, metni ve düğmeleri çiziyoruz ve alarmNotSet değişkenini true olarak ayarlayıp sonraki while döngüsüne girebiliyoruz. Burada iki düğme olan H ve M 'yi kullanarak alarmı ayarlıyoruz ve “ Ayarla ” düğmesine tıkladıktan sonra alarmın değeri alarmString değişkenine kaydediliyor.
// Alarm Clock Screen
 if (currentPage == '2') {
 myGLCD.setFont(BigFont);
 myGLCD.setColor(255, 255, 255);
 myGLCD.print("MENU", 5, 5);
 myGLCD.print("Set Alarm", CENTER, 20);

 // Draws a colon between the hours and the minutes
 myGLCD.setColor(0, 255, 0);
 myGLCD.fillCircle (112, 65, 4);
 myGLCD.setColor(0, 255, 0);
 myGLCD.fillCircle (112, 85, 4);
 myGLCD.setFont(SevenSegNumFont);
 myGLCD.setColor(0, 255, 0);
 myGLCD.printNumI(aHours, 32, 50, 2, '0');
 myGLCD.printNumI(aMinutes, 128, 50, 2, '0');
 myGLCD.setColor(255, 255, 255);
 myGLCD.drawRoundRect (42, 115, 82, 145);
 myGLCD.drawRoundRect (138, 115, 178, 145);
 myGLCD.setFont(BigFont);
 myGLCD.print("H", 54, 122);
 myGLCD.print("M", 150, 122);

 myGLCD.drawRoundRect (215, 60, 303, 90);
 myGLCD.print("SET", 236, 67);
 myGLCD.drawRoundRect (215, 115, 303, 145);
 myGLCD.print("CLEAR", 220, 122);

 alarmNotSet = true;

 while (alarmNotSet){
 if (myTouch.dataAvailable()) {
 myTouch.read();
 x = myTouch.getX(); // X coordinate where the screen has been pressed
 y = myTouch.getY(); // Y coordinates where the screen has been pressed
 //Set hours button
 if ((x >= 42) && (x <= 82) && (y >= 115) && (y <= 145)) {
 drawRectFrame(42, 115, 82, 145);
 aHours++;
 if(aHours >=24){
 aHours = 0;
 }
 myGLCD.setFont(SevenSegNumFont);
 myGLCD.setColor(0, 255, 0);
 myGLCD.printNumI(aHours, 32, 50, 2, '0');
 }
 // Set minutes buttons
 if ((x >= 138) && (x <= 178) && (y >= 115) && (y <= 145)) {
 drawRectFrame(138, 115, 178, 145);
 aMinutes++;
 if(aMinutes >=60){
 aMinutes = 0;
 }
 myGLCD.setFont(SevenSegNumFont);
 myGLCD.setColor(0, 255, 0);
 myGLCD.printNumI(aMinutes, 128, 50, 2, '0');
 }
 // Set alarm button
 if ((x >= 215) && (x <= 303) && (y >= 60) && (y <= 80)) {
 drawRectFrame(215, 60, 303, 90);
 if (aHours < 10 && aMinutes < 10){
 alarmString = "0"+(String)aHours + ":" + "0"+ (String)aMinutes + ":" + "00";
 }
 else if (aHours < 10 && aMinutes > 9){
 alarmString = "0"+(String)aHours + ":" + (String)aMinutes + ":" + "00";
 }
 else if (aHours > 9 && aMinutes < 10){
 alarmString = (String)aHours + ":" + "0"+ (String)aMinutes + ":" + "00";
 }
 else {
 alarmString = (String)aHours + ":" + (String)aMinutes + ":" + "00";
 }
 myGLCD.setFont(BigFont);
 myGLCD.print("Alarm set for:", CENTER, 165);
 myGLCD.print(alarmString, CENTER, 191);

 }
 // Clear alarm button
 if ((x >= 215) && (x <= 303) && (y >= 115) && (y <= 145)) {
 drawRectFrame(215, 115, 303, 145);
 alarmString="";
 myGLCD.setColor(0, 0, 0);
 myGLCD.fillRect(45, 165, 275, 210);
 }
 // If we press the MENU Button
 if ((x >= 0) && (x <= 75) && (y >= 0) && (y <= 30)) {
 alarmNotSet = false;
 currentPage = '0';
 myGLCD.clrScr();
 drawHomeScreen(); // Draws the Home Screen
 }
 }
 }
}
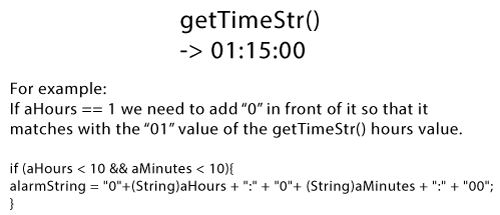
Burada, bu dizeyi getTimeString () işlevinden aldığımız dize ile aynı forma sahip olacak şekilde ayarlamamız gerektiğini unutmayın. Bu şekilde, bunları karşılaştırabilir ve saat aynı değere veya zamana ulaştığında alarmı etkinleştirebiliriz.
Sil düğmesine basarsak alarmString 'i temizleriz ve menü düğmesine basarsak bizi while döngüsünden çıkarır ve ana ekrana geri gönderir. Alarmı etkinleştirmek için alarmın ayarlanıp ayarlanmadığını kontrol ederiz ve alarmın saatle eşleşmesi durumunda, MicroSD karttaki ilk şarkı daha yüksek bir ses seviyesinde çalmaya başlayacaktır. Ayrıca “ Dismiss ” düğmesiyle birlikte tüm grafikleri çizeceğiz ve alarmOn değişkenini true olarak ayarlayacağız. Bu işlev, “ Kapat ” düğmesine basana kadar şarkının çalmaya devam etmesini sağlayacak bir sonraki while döngüsünü ayarlayacaktır.
// Alarm activation
 if (alarmNotSet == false) {
 if (alarmString == rtc.getTimeStr()){
 myGLCD.clrScr();
 mp3.setVolume(25);
 mp3.playTrackByIndexNumber(1);
 delay(100);
 myGLCD.setFont(BigFont);
 myGLCD.setColor(255, 255, 255);
 myGLCD.print("ALARM", CENTER, 90);
 myGLCD.drawBitmap (127, 10, 65, 64, AlarmButton);
 myGLCD.print(alarmString, CENTER, 114);
 myGLCD.drawRoundRect (94, 146, 226, 170);
 myGLCD.print("DISMISS", CENTER, 150);
 boolean alarmOn = true;
 while (alarmOn){
 if (myTouch.dataAvailable()) {
 myTouch.read();
 x = myTouch.getX(); // X coordinate where the screen has been pressed
 y = myTouch.getY(); // Y coordinates where the screen has been pressed

 // Stop alarm button
 if ((x >= 94) && (x <= 226) && (y >= 146) && (y <= 170)) {
 drawRectFrame(94, 146, 226, 170);
 alarmOn = false;
 alarmString="";
 myGLCD.clrScr();
 mp3.stopPlayback();
 delay(100);
 currentPage = '0';
 playStatus = '0';
 mp3.setVolume(15);
 drawHomeScreen();
 }

 }
 }
 }
}
Kod bu şekilde çalışır ve kaynak kodun tamamını makalenin altında bulabilirsiniz.
Alarmlı Çalar Saatin Oluşturulması
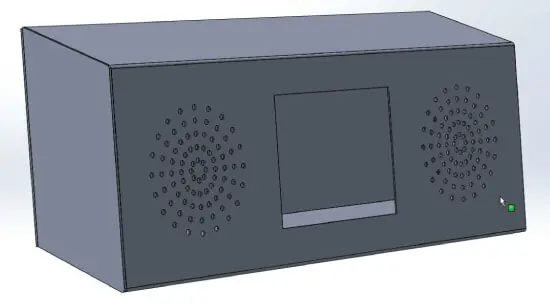
Solidworks'ü kullanarak tasarımı yaptım ve işte böyle görünüyor.
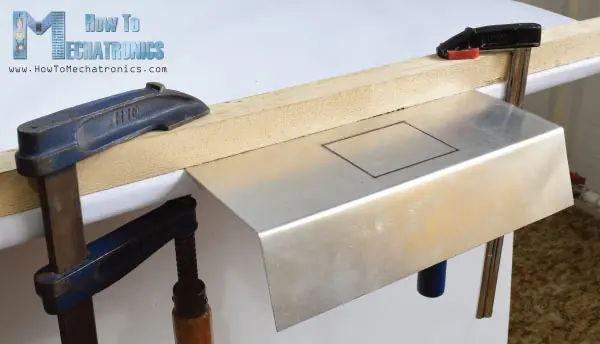
Ölçümleri buradan indirebilirsiniz: Bu proje için Alüminyum sac kullandım. Masamın kenarında bazı kelepçeler ve çıtalar yardımıyla sac ı büktüm.
Hoparlörlere gelince, dairesel bir desen yazdırdım, yerine yerleştirdim ve bir matkap kullanarak tüm delikleri açtım.
Bundan sonra kenarları uygun forma göre kestim ve bir silikon tabancası kullanarak önceden bükülmüş sac levhaya sabitledim.Sonunda sac metal kutuyu boyadım ve elektronik bileşenlerin takılması için hazırladım. Her şeyi birbirine bağladım ve cihazın arka kapağını iki cıvata kullanarak sabitledim.
İşte cihazın tam kaynak kodu:
/*
* Arduino Touch Screen MP3 Music Player and Alarm Clock
*
* Crated by Dejan Nedelkovski,
* www.HowToMechatronics.com
*
* UFTF, URTouch and DS3231 libraries made by Henning Karlsen which can be found and downloaded from his website, www.rinkydinkelectronics.com.
* BY8001 MP3 Player Library made by borland of Arduino forum, Released in public domain. Dowload link: https://github.com/r0ndL/BY8001
*/
#include <UTFT.h>
#include <URTouch.h>
#include <SoftwareSerial.h>
#include <BY8001.h>
#include <DS3231.h>
//==== Creating Objects
UTFT myGLCD(SSD1289, 38, 39, 40, 41); //Parameters should be adjusted to your Display/Schield model
URTouch myTouch( 6, 5, 4, 3, 2);
SoftwareSerial mp3Serial(11, 10); // RX, TX
BY8001 mp3; // creating an instance of class BY8001 and call it 'mp3'
DS3231 rtc(SDA, SCL);
//==== Defining Fonts
extern uint8_t SmallFont[];
extern uint8_t BigFont[];
extern uint8_t SevenSegNumFont[];
extern unsigned int MusicPlayerButton[0x1040];
extern unsigned int AlarmButton[0x1040];
extern unsigned int ButtonPlay[0x1AE9];
extern unsigned int ButtonPause[0x1AE9];
extern unsigned int PreviousButton[0x9C4];
extern unsigned int NextButton[0x9C4];
extern unsigned int VolumeDown[0x170];
extern unsigned int VolumeUp[0x3B8];
int x, y; // Variables for the coordinates where the display has been pressed
char currentPage, playStatus;
int iV = 15;
int trackNum = 1;
int b = 16;
int aHours = 0;
int aMinutes = 0;
boolean alarmNotSet = true;
String alarmString = "";
float currentTemperature, temperature;
static word totalTime, elapsedTime, playback, minutes, seconds, lastSeconds, minutesR, secondsR;
String currentClock, currentHours, currentMinutes, currentSeconds, currentDate;
String timeString, hoursString, minutesString, secondsString, hoursS, minutesS, secondsS, dateS;
void setup() {
 // Initiate display
 myGLCD.InitLCD();
 myGLCD.clrScr();
 myTouch.InitTouch();
 myTouch.setPrecision(PREC_MEDIUM);
 // Initialize the rtc object
 rtc.begin();
 // Music
 Serial.begin(9600); // set serial monitor baud rate to Arduino IDE
 mp3Serial.begin(9600); // BY8001 set to 9600 baud (required)
 mp3.setup(mp3Serial); // tell BY8001 library which serial port to use.
 delay(800); // allow time for BY8001 cold boot; may adjust depending on flash storage size

 drawHomeScreen(); // Draws the Home Screen
 currentPage = '0'; // Indicates that we are at Home Screen
 playStatus = '0';
 mp3.setVolume(15);
 delay(100);
 currentTemperature = rtc.getTemp();
 currentDate = rtc.getDateStr();
 currentClock = rtc.getTimeStr();
 timeString = rtc.getTimeStr();
 currentHours = timeString.substring(0, 2);
 currentMinutes = timeString.substring(3, 5);
 currentSeconds = timeString.substring(6, 8);
}
void loop() {
 // Homes Screen
 if (currentPage == '0') {
 // Checks for change of the clock
 if ( currentClock != rtc.getTimeStr()) {
 timeString = rtc.getTimeStr();
 hoursS = timeString.substring(0, 2);
 minutesS = timeString.substring(3, 5);
 secondsS = timeString.substring(6, 8);
 myGLCD.setFont(SevenSegNumFont);
 myGLCD.setColor(0, 255, 0);
 myGLCD.print(secondsS, 224, 50);

 if ( currentMinutes != minutesS ) {
 myGLCD.print(minutesS, 128, 50);
 currentMinutes = minutesS;
 }
 if ( currentHours != hoursS ) {
 myGLCD.print(hoursS, 32, 50);
 currentHours = hoursS;
 }
 // Checks for change of the date
 dateS = rtc.getDateStr();
 delay(10);
 if ( currentDate != dateS){
 myGLCD.setColor(255, 255, 255); // Sets color to white
 myGLCD.setFont(BigFont); // Sets font to big
 myGLCD.print(rtc.getDateStr(), 153, 7);
 }
 // Checks for change of the temperature
 temperature = rtc.getTemp();
 delay(10);
 if ( currentTemperature != temperature ){
 myGLCD.setColor(255, 255, 255); // Sets color to white
 myGLCD.setFont(BigFont); // Sets font to big
 myGLCD.printNumI(temperature, 39, 7);
 currentTemperature = temperature;
 }
 delay(10);
 currentClock = rtc.getTimeStr();
 }
 // Checks whether the screen has been touched
 if (myTouch.dataAvailable()) {
 myTouch.read();
 x = myTouch.getX(); // X coordinate where the screen has been pressed
 y = myTouch.getY(); // Y coordinates where the screen has been pressed
 // If we press the Music Player Button
 if ((x >= 55) && (x <= 120) && (y >= 125) && (y <= 190)) {
 drawFrame(87, 157, 33);
 currentPage = '1';
 myGLCD.clrScr();
 delay(100);
 drawMusicPlayerScreen();
 delay(100);
 }
 // If we press the Alarm Button
 if ((x >= 195) && (x <= 260) && (y >= 125) && (y <= 190)) {
 drawFrame(227, 160, 29);
 currentPage = '2';
 myGLCD.clrScr();
 }
 }
 }

 // Music Player Screen
 if (currentPage == '1') {
 if (myTouch.dataAvailable()) {
 myTouch.read();
 x = myTouch.getX(); // X coordinate where the screen has been pressed
 y = myTouch.getY(); // Y coordinates where the screen has been pressed
 // If we press the Play Button
 if ((x >= 116) && (x <= 204) && (y >= 77) && (y <= 165)) {
 if (playStatus == '0') {
 drawFrame(159, 121, 42);
 drawPauseButton();
 mp3.playTrackFromFolder(00, 001);
 delay(100);
 playStatus = '2';
 return;
 }
 if (playStatus == '1') {
 drawFrame(159, 121, 42);
 drawPauseButton();
 mp3.play();
 delay(100);
 playStatus = '2';
 return;
 }
 if (playStatus == '2') {
 drawFrame(159, 121, 42);
 drawPlayButton();
 mp3.pause();
 delay(100);
 playStatus = '1';
 return;
 }
 }
 // If we press the Previous Button
 if ((x >= 45) && (x <= 95) && (y >= 97) && (y <= 147)) {
 drawFrame(70, 121, 26);
 mp3.previousTrack();
 delay(100);
 drawTrackBar();
 }
 // If we press the Next Button
 if ((x >= 227) && (x <= 277) && (y >= 97) && (y <= 147)) {
 drawFrame(252, 122, 26);
 mp3.nextTrack();
 delay(100);
 drawTrackBar();
 }
 // If we press the VolumeDown Button
 if ((x >= 35) && (x <= 75) && (y >= 165) && (y <= 209)) {
 drawUnderline(45, 205, 65, 205);
 if (iV >= 0 & iV <= 30) {
 iV--;
 drawVolume(iV);
 }
 mp3.decreaseVolume();
 delay(100);
 }
 // If we press the VolumeUp Button
 if ((x >= 230) && (x <= 280) && (y >= 165) && (y <= 209)) {
 drawUnderline(235, 205, 275, 205);
 if (iV >= 0 & iV <= 30) {
 iV++;
 drawVolume(iV);
 }
 mp3.increaseVolume();
 delay(100);
 }
 // If we press the MENU Button
 if ((x >= 0) && (x <= 75) && (y >= 0) && (y <= 30)) {
 myGLCD.clrScr();
 drawHomeScreen(); // Draws the Home Screen
 currentPage = '0';
 return;
 }
 }
 // Updates the track bar
 if (playStatus == '1' || playStatus == '2') {
 trackPlayTime();
 }
 // Printing the clock in the upper right corner
 myGLCD.setFont(BigFont);
 myGLCD.setColor(255, 255, 255);
 printClock(187, 5);
 }
 // Alarm Clock Screen
 if (currentPage == '2') {
 myGLCD.setFont(BigFont);
 myGLCD.setColor(255, 255, 255);
 myGLCD.print("MENU", 5, 5);
 myGLCD.print("Set Alarm", CENTER, 20);

 // Draws a colon between the hours and the minutes
 myGLCD.setColor(0, 255, 0);
 myGLCD.fillCircle (112, 65, 4);
 myGLCD.setColor(0, 255, 0);
 myGLCD.fillCircle (112, 85, 4);
 myGLCD.setFont(SevenSegNumFont);
 myGLCD.setColor(0, 255, 0);
 myGLCD.printNumI(aHours, 32, 50, 2, '0');
 myGLCD.printNumI(aMinutes, 128, 50, 2, '0');
 myGLCD.setColor(255, 255, 255);
 myGLCD.drawRoundRect (42, 115, 82, 145);
 myGLCD.drawRoundRect (138, 115, 178, 145);
 myGLCD.setFont(BigFont);
 myGLCD.print("H", 54, 122);
 myGLCD.print("M", 150, 122);

 myGLCD.drawRoundRect (215, 60, 303, 90);
 myGLCD.print("SET", 236, 67);
 myGLCD.drawRoundRect (215, 115, 303, 145);
 myGLCD.print("CLEAR", 220, 122);

 alarmNotSet = true;

 while (alarmNotSet){
 if (myTouch.dataAvailable()) {
 myTouch.read();
 x = myTouch.getX(); // X coordinate where the screen has been pressed
 y = myTouch.getY(); // Y coordinates where the screen has been pressed
 //Set hours button
 if ((x >= 42) && (x <= 82) && (y >= 115) && (y <= 145)) {
 drawRectFrame(42, 115, 82, 145);
 aHours++;
 if(aHours >=24){
 aHours = 0;
 }
 myGLCD.setFont(SevenSegNumFont);
 myGLCD.setColor(0, 255, 0);
 myGLCD.printNumI(aHours, 32, 50, 2, '0');
 }
 // Set minutes buttons
 if ((x >= 138) && (x <= 178) && (y >= 115) && (y <= 145)) {
 drawRectFrame(138, 115, 178, 145);
 aMinutes++;
 if(aMinutes >=60){
 aMinutes = 0;
 }
 myGLCD.setFont(SevenSegNumFont);
 myGLCD.setColor(0, 255, 0);
 myGLCD.printNumI(aMinutes, 128, 50, 2, '0');
 }
 // Set alarm button
 if ((x >= 215) && (x <= 303) && (y >= 60) && (y <= 80)) {
 drawRectFrame(215, 60, 303, 90);
 if (aHours < 10 && aMinutes < 10){
 alarmString = "0"+(String)aHours + ":" + "0"+ (String)aMinutes + ":" + "00";
 }
 else if (aHours < 10 && aMinutes > 9){
 alarmString = "0"+(String)aHours + ":" + (String)aMinutes + ":" + "00";
 }
 else if (aHours > 9 && aMinutes < 10){
 alarmString = (String)aHours + ":" + "0"+ (String)aMinutes + ":" + "00";
 }
 else {
 alarmString = (String)aHours + ":" + (String)aMinutes + ":" + "00";
 }
 myGLCD.setFont(BigFont);
 myGLCD.print("Alarm set for:", CENTER, 165);
 myGLCD.print(alarmString, CENTER, 191);

 }
 // Clear alarm button
 if ((x >= 215) && (x <= 303) && (y >= 115) && (y <= 145)) {
 drawRectFrame(215, 115, 303, 145);
 alarmString="";
 myGLCD.setColor(0, 0, 0);
 myGLCD.fillRect(45, 165, 275, 210);
 }
 // If we press the MENU Button
 if ((x >= 0) && (x <= 75) && (y >= 0) && (y <= 30)) {
 alarmNotSet = false;
 currentPage = '0';
 myGLCD.clrScr();
 drawHomeScreen(); // Draws the Home Screen
 }
 }
 }

 }
 // Alarm activation
 if (alarmNotSet == false) {
 if (alarmString == rtc.getTimeStr()){
 myGLCD.clrScr();
 mp3.setVolume(25);
 mp3.playTrackByIndexNumber(1);
 delay(100);
 myGLCD.setFont(BigFont);
 myGLCD.setColor(255, 255, 255);
 myGLCD.print("ALARM", CENTER, 90);
 myGLCD.drawBitmap (127, 10, 65, 64, AlarmButton);
 myGLCD.print(alarmString, CENTER, 114);
 myGLCD.drawRoundRect (94, 146, 226, 170);
 myGLCD.print("DISMISS", CENTER, 150);
 boolean alarmOn = true;
 while (alarmOn){
 if (myTouch.dataAvailable()) {
 myTouch.read();
 x = myTouch.getX(); // X coordinate where the screen has been pressed
 y = myTouch.getY(); // Y coordinates where the screen has been pressed

 // Stop alarm button
 if ((x >= 94) && (x <= 226) && (y >= 146) && (y <= 170)) {
 drawRectFrame(94, 146, 226, 170);
 alarmOn = false;
 alarmString="";
 myGLCD.clrScr();
 mp3.stopPlayback();
 delay(100);
 currentPage = '0';
 playStatus = '0';
 mp3.setVolume(15);
 drawHomeScreen();
 }

 }
 }
 }
 }
}
void drawHomeScreen() {
 myGLCD.setBackColor(0, 0, 0); // Sets the background color of the area where the text will be printed to black
 myGLCD.setColor(255, 255, 255); // Sets color to white
 myGLCD.setFont(BigFont); // Sets font to big
 myGLCD.print(rtc.getDateStr(), 153, 7);
 myGLCD.print("T:", 7, 7);
 myGLCD.printNumI(rtc.getTemp(), 39, 7);
 myGLCD.print("C", 82, 7);
 myGLCD.setFont(SmallFont);
 myGLCD.print("o", 74, 5);
 if (alarmString == "" ) {
 myGLCD.setColor(255, 255, 255);
 myGLCD.print("by www.HowToMechatronics.com", CENTER, 215);
 }
 else {
 myGLCD.setColor(255, 255, 255);
 myGLCD.print("Alarm set for: ", 68, 215);
 myGLCD.print(alarmString, 188, 215);
 }
 drawMusicPlayerButton();
 drawAlarmButton();
 drawHomeClock();
}
void drawMusicPlayerScreen() {
 // Title
 myGLCD.setBackColor(0, 0, 0); // Sets the background color of the area where the text will be printed to black
 myGLCD.setColor(255, 255, 255); // Sets color to white
 myGLCD.setFont(BigFont); // Sets font to big
 myGLCD.print("MENU", 5, 5); // Prints the string on the screen
 myGLCD.setColor(255, 0, 0); // Sets color to red
 myGLCD.drawLine(0, 26, 319, 26); // Draws the red line
 myGLCD.setColor(255, 255, 255); // Sets color to white
 myGLCD.setFont(SmallFont); // Sets font to big
 myGLCD.print("by www.HowToMechatronics.com", CENTER, 215); // Prints the string on the screen
 // Volume Bar
 myGLCD.setColor(255, 255, 255);
 myGLCD.fillRect (78, 184, 78 + 150, 184 + 8);
 myGLCD.setColor(240, 196, 30);
 myGLCD.fillRect (78, 184, 78 + 75, 184 + 8);
 // Track Bar
 myGLCD.setColor(255, 255, 255);
 myGLCD.fillRect (48, 50, 48 + 224, 50 + 8);
 myGLCD.setFont(SmallFont);
 myGLCD.setColor(255, 255, 255);
 myGLCD.print("0:00", 8, 48);
 myGLCD.print("-0:00", 276, 48);
 drawPlayButton();
 if (playStatus == '2') {
 drawPauseButton();
 }
 drawPreviousButton();
 drawNextButton();
 drawVolumeDown();
 drawVolumeUp();
}
void drawMusicPlayerButton() {
 myGLCD.drawBitmap (55, 125, 65, 64, MusicPlayerButton);
}
void drawAlarmButton() {
 myGLCD.drawBitmap (195, 125, 65, 64, AlarmButton);
}
void drawPlayButton() {
 myGLCD.drawBitmap (118, 79, 83, 83, ButtonPlay);
}
void drawPauseButton() {
 myGLCD.drawBitmap (118, 79, 83, 83, ButtonPause);
}
void drawNextButton() {
 myGLCD.drawBitmap (227, 97, 50, 50, NextButton);
}
void drawPreviousButton() {
 myGLCD.drawBitmap (45, 97, 50, 50, PreviousButton);
}
void drawVolumeDown() {
 myGLCD.drawBitmap (50, 177, 16, 23, VolumeDown);
}
void drawVolumeUp() {
 myGLCD.drawBitmap (241, 175, 34, 28, VolumeUp);
}
// check for if Mp3 Player is stopped
bool checkFor_mp3IsStopped() {
 if (mp3Serial.available() > 0) {
 if (mp3.getPlaybackStatus() == 0) {
 return true;
 }
 }
 else return false;
}
// Highlights the button when pressed
void drawFrame(int x, int y, int r) {
 myGLCD.setColor(255, 0, 0);
 myGLCD.drawCircle (x, y, r);
 while (myTouch.dataAvailable())
 myTouch.read();
 myGLCD.setColor(0, 0, 0);
 myGLCD.drawCircle (x, y, r);
}
void drawRectFrame(int x1, int y1, int x2, int y2) {
 myGLCD.setColor(255, 0, 0);
 myGLCD.drawRoundRect (x1, y1, x2, y2);
 while (myTouch.dataAvailable())
 myTouch.read();
 myGLCD.setColor(255, 255, 255);
 myGLCD.drawRoundRect (x1, y1, x2, y2);
}
void drawUnderline(int x1, int y1, int x2, int y2) {
 myGLCD.setColor(255, 0, 0);
 myGLCD.drawLine (x1, y1, x2, y2);
 while (myTouch.dataAvailable())
 myTouch.read();
 myGLCD.setColor(0, 0, 0);
 myGLCD.drawLine (x1, y1, x2, y2);
}
// Sound bar
void drawVolume(int x) {
 myGLCD.setColor(255, 255, 255);
 myGLCD.fillRect (78 + 5 * x, 184, 78 + 150, 184 + 8);
 myGLCD.setColor(240, 196, 30);
 myGLCD.fillRect (78, 184, 78 + 5 * x, 184 + 8);
}
// Clears the track bar
void drawTrackBar() {
 myGLCD.setColor(255, 255, 255);
 myGLCD.fillRect (48, 50, 48 + 224, 50 + 8);
}
// Updates the track bar
void trackPlayTime() {
 totalTime = mp3.getTotalTrackPlaybackTime();
 delay(10);
 elapsedTime = mp3.getElapsedTrackPlaybackTime();
 delay(10);
 minutes = (int)elapsedTime / 60;
 seconds = (((float)elapsedTime / 60) - minutes) * 60;
 playback = totalTime - elapsedTime;
 minutesR = (int)playback / 60;
 secondsR = (((float)playback / 60) - minutesR) * 60;
 myGLCD.setFont(SmallFont);
 myGLCD.setColor(255, 255, 255);
 myGLCD.printNumI(minutes, 8, 48);
 myGLCD.print(":", 16, 48);
 myGLCD.printNumI((int)seconds, 24, 48, 2, '0');
 myGLCD.print("-", 276, 48);
 myGLCD.printNumI(minutesR, 284, 48);
 myGLCD.print(":", 292, 48);
 myGLCD.printNumI((int)secondsR, 300, 48, 2, '0');
 int trackBarX = map(elapsedTime, 0, totalTime, 0, 224);
 myGLCD.setColor(255, 0, 0);
 myGLCD.fillRect (48, 50, 48 + trackBarX, 50 + 8);
 if (totalTime == elapsedTime) {
 mp3.nextTrack();
 delay(30);
 myGLCD.setColor(255, 255, 255);
 myGLCD.fillRect (48, 50, 48 + 224, 50 + 8);
 }
}
void printClock(int x, int y) {
 if ( currentClock != rtc.getTimeStr()) {
 myGLCD.print(rtc.getTimeStr(), x, y);
 currentClock = rtc.getTimeStr();
 }
}
void drawColon() {
 myGLCD.setColor(0, 255, 0);
 myGLCD.fillCircle (112, 65, 4);
 myGLCD.setColor(0, 255, 0);
 myGLCD.fillCircle (112, 85, 4);
 myGLCD.setColor(0, 255, 0);
 myGLCD.fillCircle (208, 65, 4);
 myGLCD.setColor(0, 255, 0);
 myGLCD.fillCircle (208, 85, 4);
}
void drawHomeClock() {
 timeString = rtc.getTimeStr();
 currentHours = timeString.substring(0, 2);
 currentMinutes = timeString.substring(3, 5);
 currentSeconds = timeString.substring(6, 8);
 myGLCD.setFont(SevenSegNumFont);
 myGLCD.setColor(0, 255, 0);
 myGLCD.print(currentSeconds, 224, 50);
 myGLCD.print(currentMinutes, 128, 50);
 myGLCD.print(currentHours, 32, 50);
 drawColon();
}